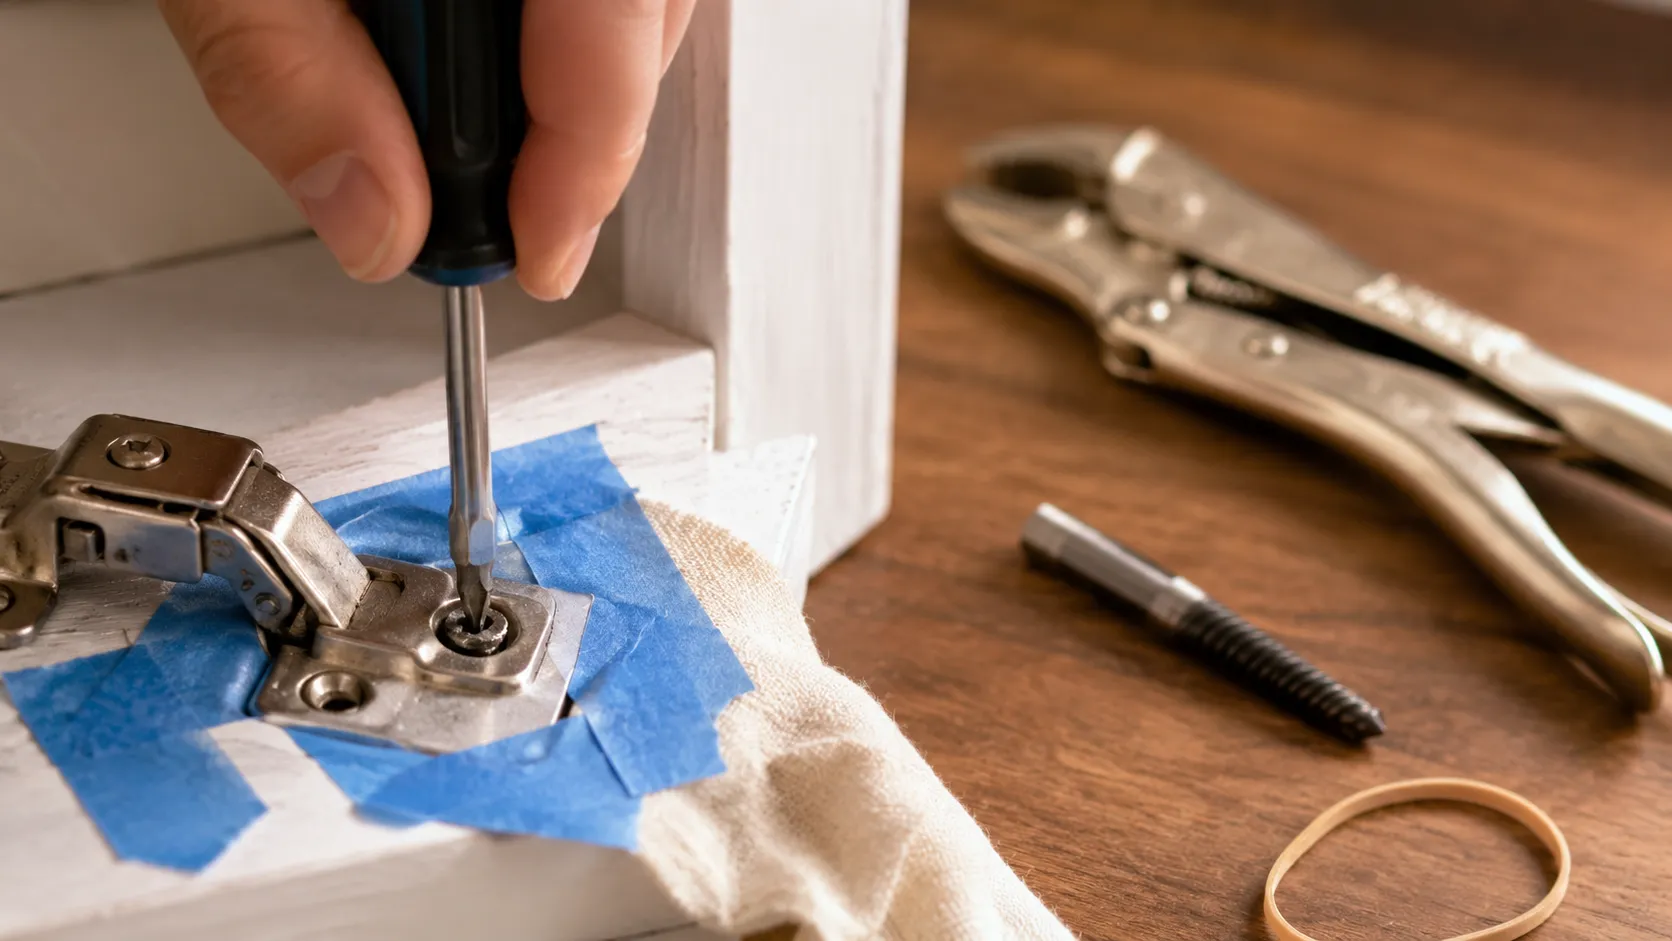
A stripped screw often gets worse when the driver keeps slipping across the damaged recess. A lower-risk approach is to stop once the bit no longer holds, check how much of the head is accessible, and move from controlled methods toward ones that remove material from the screw.
A slightly damaged Phillips screw in a cabinet hinge may come out with a better-fitting hand driver. A flush hex screw with a rounded socket may need an extractor. The right starting point depends on the head, surrounding material, and available working room.
First, Check What Kind of Damage You Have
Before choosing a removal method, confirm that the problem is actually a stripped screw head. Here, the drive recess is damaged enough that a screwdriver or bit cannot engage it securely. That differs from a broken screw, where part of the fastener has snapped, or a stripped screw hole, where the threads in the material no longer hold properly.
Next, look at the head. If it protrudes above the surface, you may be able to grip the outside with pliers and ignore the damaged recess. A flush screw gives you less room, while a recessed or headless fastener may require a method that works inside the damaged drive.
Also identify the drive type. Phillips, hex or Allen, and Torx fasteners use different profiles, so the wrong bit can slip even when some usable shape remains.
Protect the Surface Before You Apply More Force
A slipping tool can scratch painted metal, mark finished wood, or gouge softer material around the screw. Before drilling or cutting, clear the area around the head, improve your access, and use the most controllable tool that can still get the screw moving.
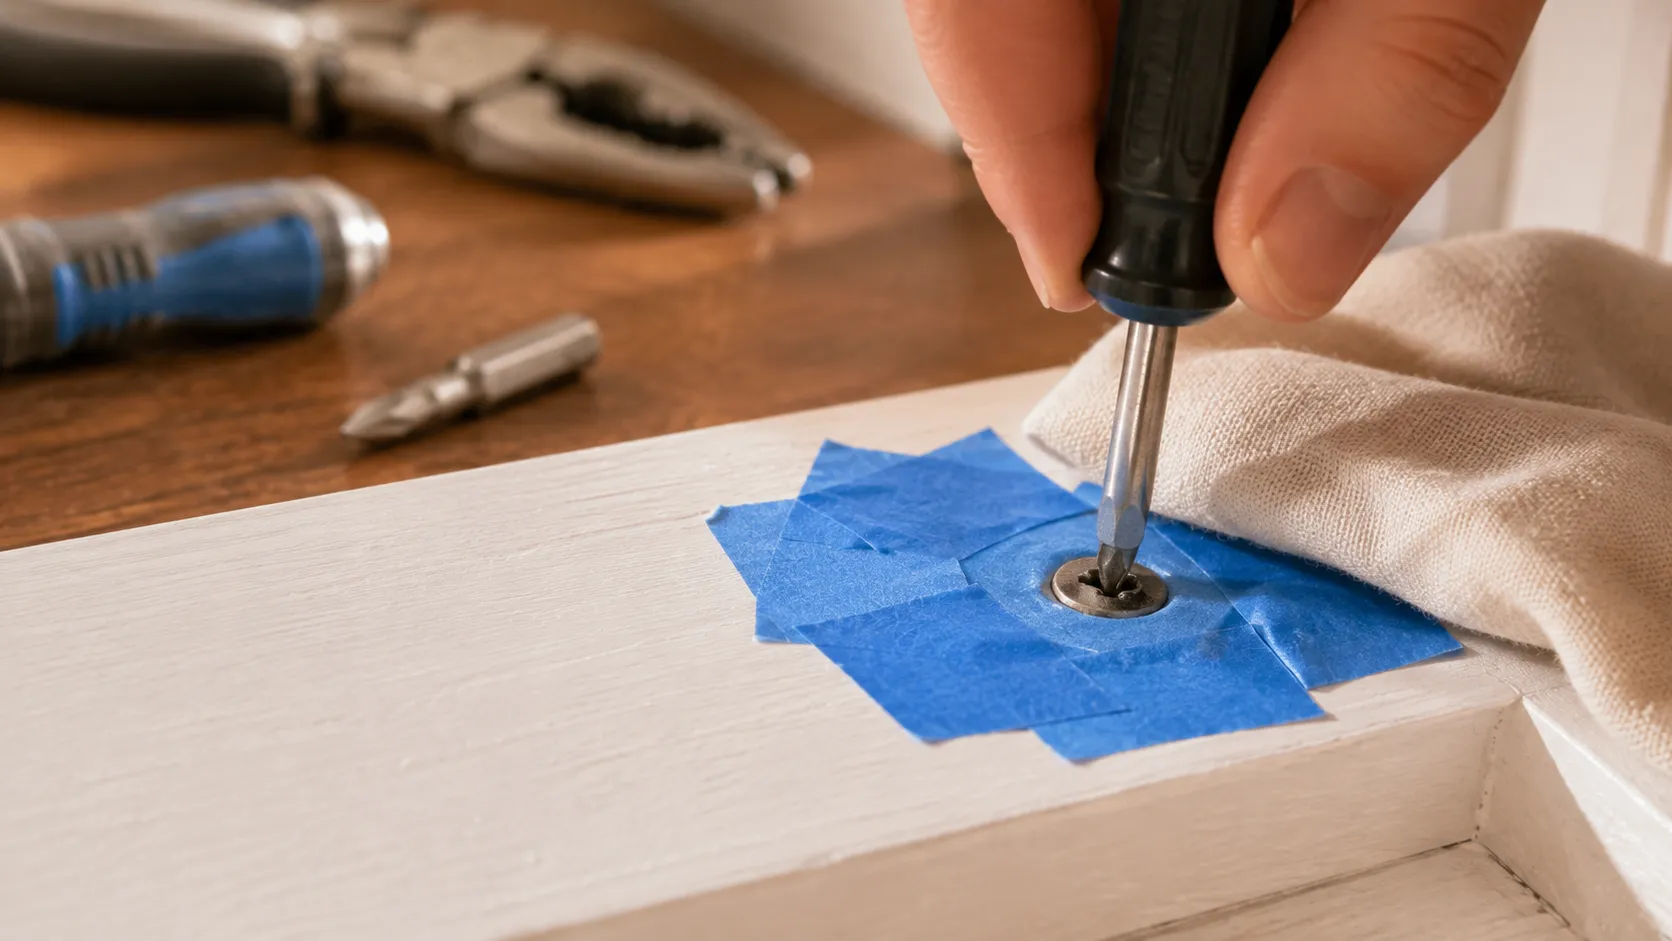
A practical order is to increase the level of intervention only when the previous step cannot produce reliable engagement.
- Try the correct, closely fitting driver by hand.
- Add a friction aid if some of the original recess remains.
- Grip the outside of an exposed head with locking pliers.
- Use a screw extractor when the head cannot be gripped externally.
- Cut a new slot only after less destructive options have failed.
The table below helps match the screw condition to a sensible first attempt.
| Situation | Try First | Next Step | What to Watch For |
|---|---|---|---|
| Lightly damaged recess | Closely fitting hand driver | Friction aid | Stop if the bit keeps slipping |
| Head protrudes | Hand driver or locking pliers | Extractor if needed | Keep pliers off the finish |
| Head sits flush | Driver with added grip | Screw extractor | Keep the drill centered |
| Recess is heavily rounded | Screw extractor | New slot if accessible | Avoid removing unnecessary material |
| Delicate finished area | Controlled hand methods | Extractor only if needed | Maintain clearance around the head |
No method is guaranteed to leave every workpiece untouched. This sequence simply delays drilling and cutting until they are actually needed.
Try the Least-Destructive Methods First
A damaged screw may still have enough of its original drive profile to turn. Start by using that remaining shape rather than immediately altering the head.
Use a Better-Fitting Manual Driver
Choose a clean driver that matches the screw profile and fills the recess as closely as possible. A worn Phillips bit, undersized hex key, or tool held at an angle can slip instead of transferring useful turning force.
Seat a manual screwdriver squarely in the recess, apply steady downward pressure, and turn slowly. If it slips repeatedly, stop. Continued cam-out can damage the recess further.
Trying a different size can help when the original bit was simply a poor fit, but forcing an oversized tool into the recess is not a reliable fix. The goal is better engagement, not more force.
Add Grip Before You Alter the Head
If the recess is rounded but still recognizable, a rubber band can sometimes help the driver make better contact. Lay a wide section of rubber over the head, press the correct driver into it, and turn slowly by hand.
If the driver cannot seat or keeps spinning, move on instead of increasing pressure until the head is completely rounded.
If the Screw Head Sticks Out, Grip It From the Outside
A protruding head gives you another surface to work with. Locking pliers can grip the outside edge of the screw, bypassing the damaged recess.
Clamp the jaws where they can hold the head without rubbing against the surrounding finish. Once the grip is stable, turn slowly. A conventional right-hand-threaded screw normally loosens counterclockwise.
This depends on access. If the pliers cannot close securely without touching the workpiece, forcing them into the gap can cause more damage than it solves. An extractor may be the better next option.
If the Head Is Flush or Recessed, Use an Extractor Carefully
When there is no external edge for pliers to hold, a screw extractor can create new purchase in the damaged fastener. Extractor kits are not all used the same way, so the instructions supplied with the specific set should take priority over a generic sequence.
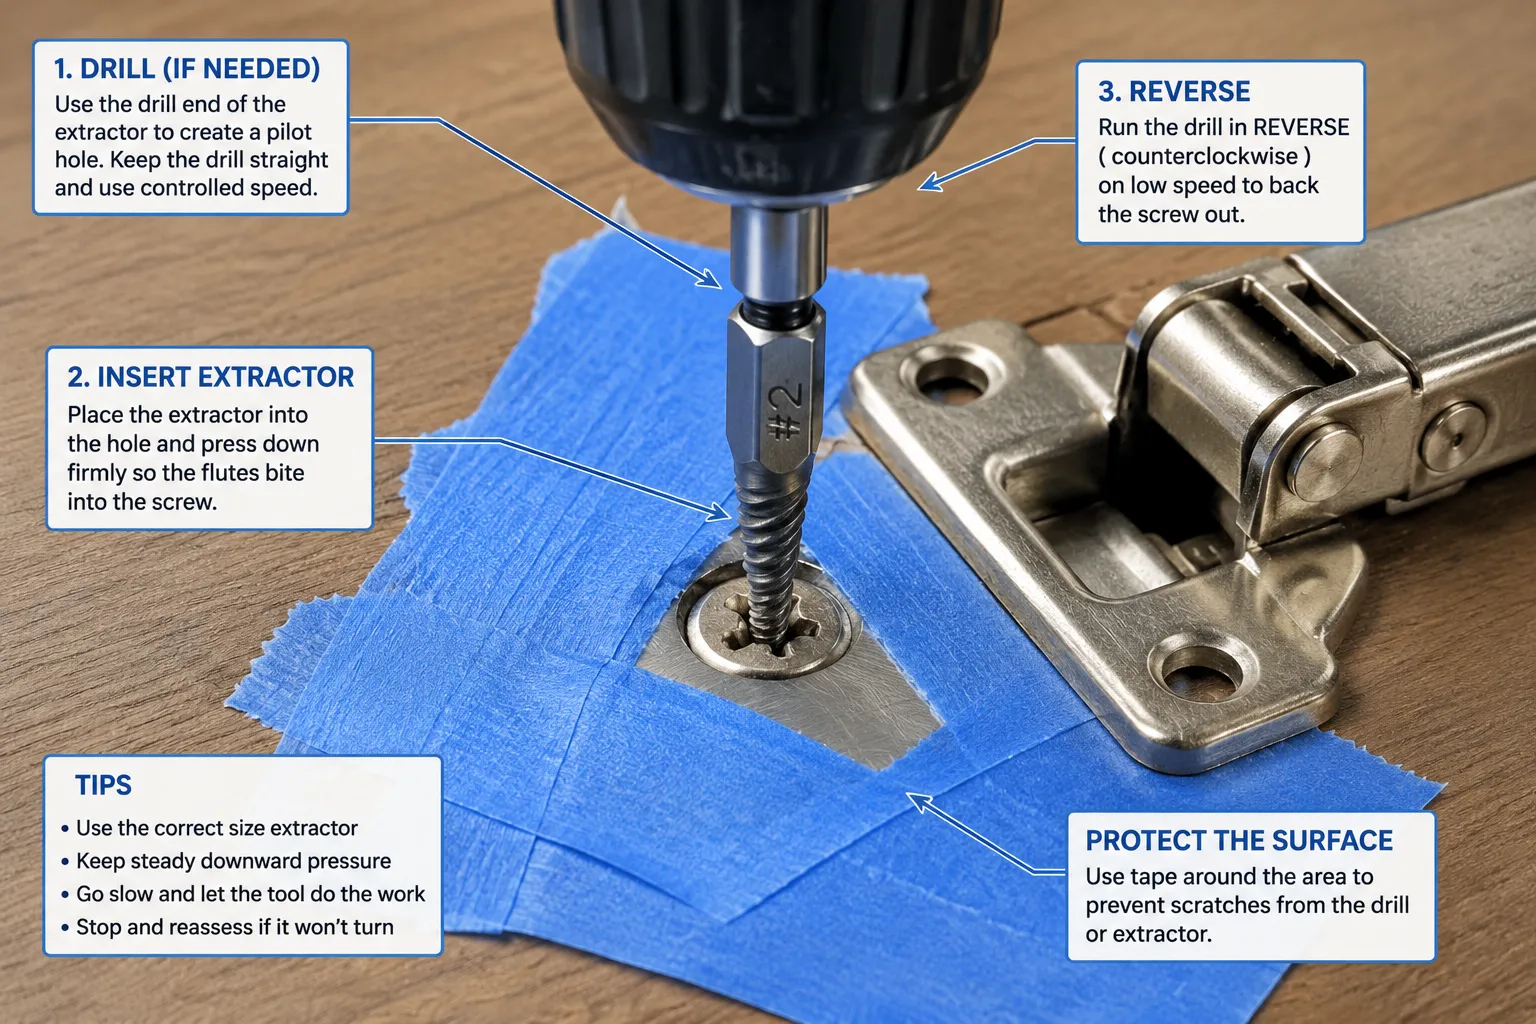
Many kits use one end or bit to prepare the damaged head and another to bite into the screw for removal. Direction, speed, and extractor size depend on the kit.
Keep the drill aligned with the screw and use only as much preparation as the extractor requires. Repeatedly enlarging the damaged area removes more material from the head. If the extractor does not bite, reassess its size, alignment, and instructions before drilling farther.
Adjust the Method for the Screw and Surface
The surrounding material changes how much clearance and tool contact you can tolerate. Instead of assuming that wood, metal, or plastic always needs one method, consider the sensitivity of the finish, access around the head, and whether the tool or accessory suits the material.
Wood, Metal, and Plastic
On painted or finished wood, pliers can mark the surface and a wandering drill can leave a visible scar. Hinges and brackets may also restrict the angle at which you can position the tool.
Metal workpieces can still have coatings or polished finishes that scratch. If corrosion is also holding the threads, penetrating oil may help with the seized connection, but it does not repair the damaged drive recess.
With plastic, pay close attention to clearance and accessory compatibility. Drilling or cutting beyond the fastener can damage the surrounding part, and cutting accessories should only be used on materials for which they are intended.
Phillips, Hex/Allen, and Torx
The basic removal logic stays the same across drive types. Use the correct geometry first, preserve whatever engagement remains, and stop when the bit is clearly slipping.
A Phillips recess may lose the edges of its cross-shaped profile. A hex or Allen socket can round at the internal corners, while a Torx recess can lose the edges that let the star-shaped driver transmit torque.
The condition and position of the screw matter more than the label. A protruding stripped hex screw may be easy to grip from the outside, while a flush Phillips screw may require an extractor. A headless set screw inside a tapped hole offers no external head for pliers to hold.
Cut a New Slot Only as a Last Resort
When the original recess is unusable and an extractor has not solved the problem, cutting a straight slot across an accessible head can create a new drive surface for a flathead screwdriver.
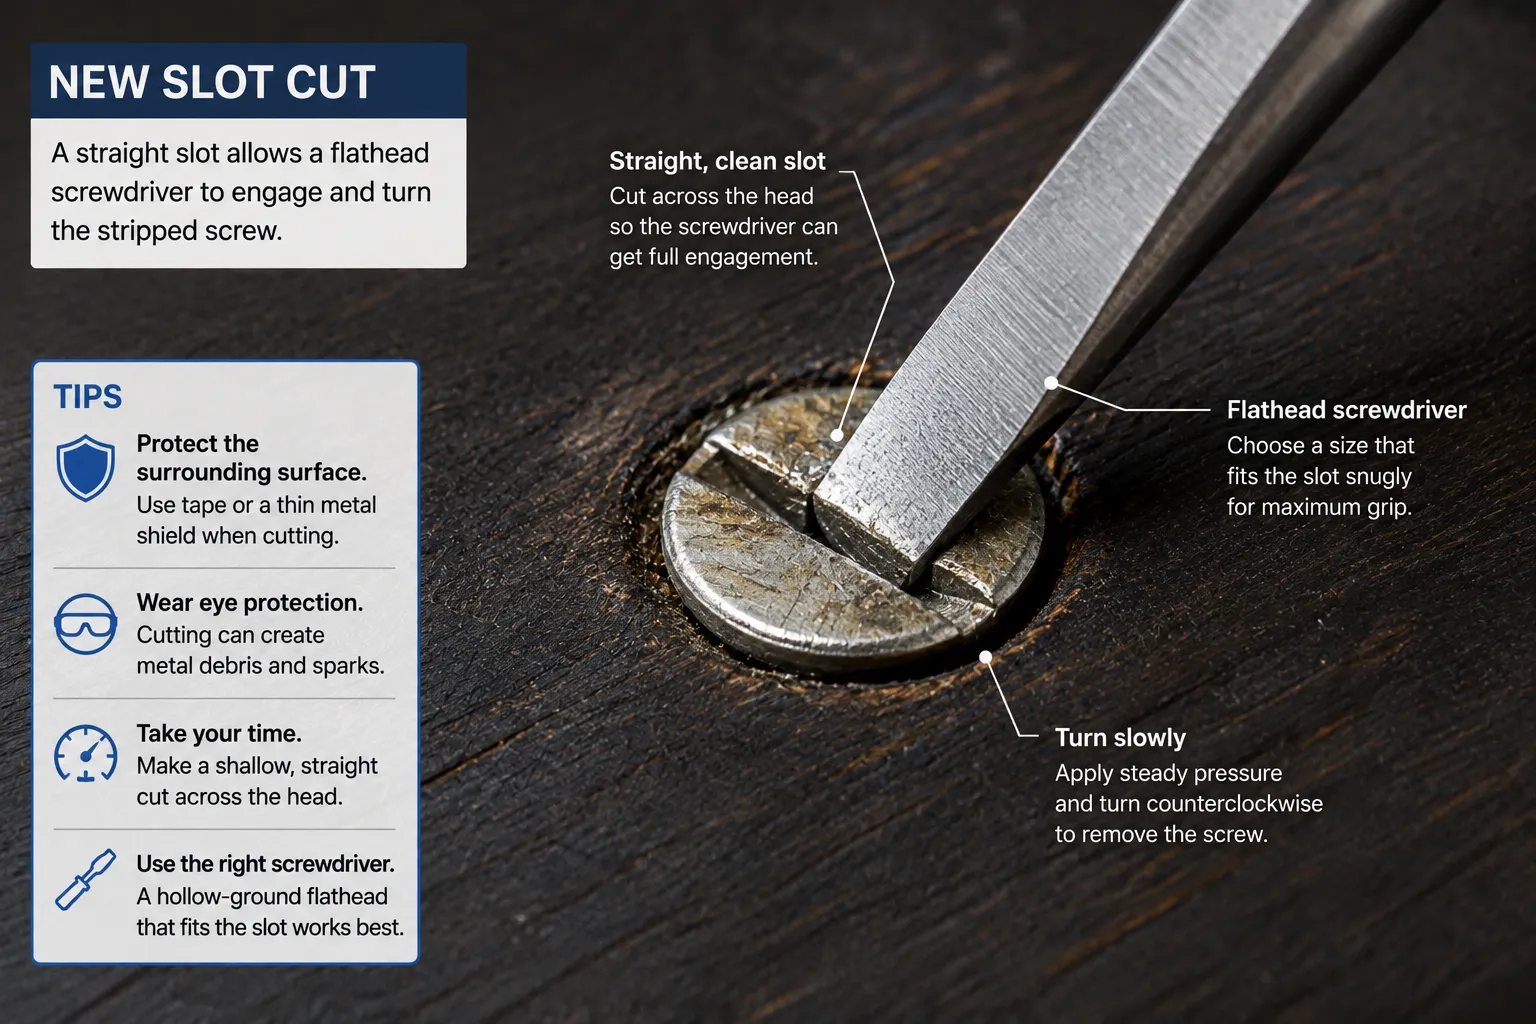
This is a more aggressive step because a rotary tool and cutting wheel remove metal close to the workpiece. It makes the most sense when the head is accessible and there is enough clearance to control the cut.
Wear eye protection, secure the work where practical, and keep flammable materials away because cutting metal can create sparks and debris. Use a cutting accessory appropriate for the material and follow the tool manufacturer’s instructions.
Keep the slot inside the screw head. If you cannot position the tool cleanly beside a visible or delicate finish, do not force the cut simply because it is the next method on the list.
Avoid Stripping the Replacement Screw
Once the damaged screw is out, use a bit that matches both the drive type and size, and keep the driver aligned with the screw rather than working at an angle.
With a powered drill or driver, use controlled speed and an appropriate clutch or torque setting instead of continuing to drive as resistance increases. If the bit starts slipping, stop and correct the fit or alignment.
In wood, a pilot hole may be appropriate when the material, screw type, or installation calls for one. Hard or thick material may benefit from pre-drilling, while some screws are designed to be driven without a pilot hole. Follow the fastener manufacturer’s guidance rather than treating pre-drilling as a universal rule.
Use the Smallest Step That Works
A stripped screw does not automatically require drilling or cutting. If part of the drive still engages, preserve it. If the head is exposed, use that access. When neither option gives you control, move to an extractor and reserve cutting for cases where simpler methods have failed.
The useful stopping point is the first method that lets you turn the screw predictably without creating a larger problem in the surrounding material.